To charge a gel battery, it’s essential to use a compatible charger, preferably one designed specifically for gel batteries. The charging process should involve three stages: bulk, absorption, and float, with voltage settings of 14.0-14.2V for the bulk charge and 13.5-13.8V for the float charge. The proper temperature should be maintained during charging, ideally between 50-85°F (10-29°C), to ensure optimal battery performance. Make sure to monitor the charging process to prevent overcharging or overheating, as this can damage the battery.
As someone who’s been in the battery game for decades, I can’t tell you how many times I’ve been asked: “How To Charge A Gel Battery?” Well, you’re in luck, because today I’m going to share my wealth of knowledge on this very topic. Gel batteries are an essential component in a variety of applications, from renewable energy systems to boats and RVs. Ensuring proper charging is crucial, as it can extend your battery’s life and performance. So, buckle up, and let’s dive into the exciting world of gel battery charging, with yours truly as your guide.
So, you’re eager to learn more about gel batteries, huh? Well, let’s jump right in and start by understanding the basics, and I promise it’ll be a fun ride!
Understanding Gel Batteries
Before we dive into the nitty-gritty of gel batteries, let’s take a step back and explore what they’re all about.
A gel battery, or gel cell battery, is a type of lead-acid battery where the electrolyte is mixed with silica to form a gel-like substance. This prevents leaks and spills, making them safer and more reliable than traditional wet-cell batteries. Plus, gel batteries have a slower self-discharge rate and are more resistant to deep discharges, which is perfect for applications that require extended periods of use.
Comparison between gel batteries and other types
| Feature | Gel Battery | AGM Battery | Lead-Acid Battery | Lithium-ion Battery |
|---|---|---|---|---|
| Electrolyte | Gel | Absorbed | Liquid | Solid |
| Maintenance | Low | Low | High | Low |
| Cycle Life | Good | Good | Moderate | Excellent |
| Charge Current | Low | Moderate | High | High |
| Price | Moderate | Moderate | Low | High |
| Weight | Moderate | Moderate | Heavy | Light |
Common uses of gel batteries
Gel batteries are versatile and can be found in a variety of applications. Some of the most common uses include:
- Solar power systems: Their ability to handle deep discharge cycles and low self-discharge rates make gel batteries an ideal choice for storing solar energy.
- Marine applications: Boats often require batteries that can withstand harsh conditions, and gel batteries fit the bill with their leak-proof and maintenance-free nature.
- Recreational vehicles (RVs): Just like boats, RVs need reliable batteries that can handle the rigors of life on the road. Gel batteries provide consistent power without the need for constant monitoring and maintenance.
Now that we’ve got a good grasp of what gel batteries are and how they stack up against other types, let’s dive deeper into the world of charging these fantastic powerhouses!
Alright, now that we’ve got the basics down, it’s time to talk about an essential aspect of gel battery charging: selecting the right charger. Trust me, picking the right charger can make all the difference in the world!
Choosing the Right Charger for Your Gel Battery
Choosing the perfect charger for your gel battery is not only essential for optimal performance, but it can also help prolong the life of your battery. Let’s dive into the details.
A. The necessity of using a gel battery-specific charger
It’s crucial to use a charger specifically designed for gel batteries. Why? Well, gel batteries require a slightly different charging process compared to other battery types. Using the wrong charger can lead to overcharging or undercharging, which can harm your battery and shorten its life.
B. Key features to consider when selecting a gel battery charger
When selecting a charger for your gel battery, there are a few critical features to consider:
- Voltage compatibility: Make sure the charger is compatible with your battery’s voltage (e.g., 12V, 24V, 48V). A mismatch in voltage can cause severe damage to your battery.
- Charging stages: Look for a charger that offers multiple charging stages (bulk, absorption, float) to ensure a proper and efficient charging process. Here’s a brief overview of the charging stages:
| Stage | Description |
|---|---|
| Bulk | Rapid charging, delivering maximum current until a specific voltage is reached. |
| Absorption | Tapering of current, allowing the battery to reach a full charge. |
| Float | Maintenance charging, keeping the battery at a full charge without overcharging. |
- Safety features: A good charger should have safety features like temperature compensation, short-circuit protection, and reverse polarity protection to prevent any potential hazards during the charging process.
C. Recommended gel battery chargers on the market
Now, with so many chargers available, it can be tough to choose the right one. But don’t worry, I’ve got your back! Here are a few highly recommended gel battery chargers on the market:
- NOCO Genius G3500 – A versatile charger suitable for 6V and 12V gel batteries, with multiple charging modes and safety features.
- Battery Tender Plus – A popular 12V charger, perfect for maintaining your gel battery at optimal charge levels.
- CTEK MUS 4.3 – A fully-automatic charger compatible with 12V gel batteries, offering eight charging steps and advanced safety features.
Remember, investing in the right charger will not only ensure your gel battery performs at its best, but it will also help extend its life, saving you time and money in the long run!
Now that we’ve covered the importance of choosing the right charger, let’s get down to business and prepare your gel battery for charging. Safety and proper preparation are essential, so let’s make sure we get this right!
Preparing Your Gel Battery for Charging
Before you connect that charger, we need to ensure that everything is safe and ready to go. Here’s what we’ll cover:
A. Safety precautions during charging
Safety first, my friends! Charging a battery can produce hydrogen gas, which can be explosive if not handled properly. So, keep these safety tips in mind:
- Ventilation: Charge your battery in a well-ventilated area to avoid the buildup of dangerous gases.
- Spark prevention: Keep sparks, flames, and smoking materials away from the charging area to avoid igniting hydrogen gas.
- Protective gear: Wear protective eyewear and gloves to avoid contact with battery acid.
B. Battery inspection
Before charging, give your gel battery a thorough inspection. Look for any signs of damage, swelling, or leaks. If you find any of these issues, it’s best to consult a professional before proceeding with charging.
C. Cleaning battery terminals
A clean battery terminal ensures a good connection with the charger, allowing for efficient charging. Here’s a step-by-step guide to cleaning those terminals:
- Disconnect the battery: Remove the battery from your device or disconnect the cables to avoid any electrical hazards.
- Mix a cleaning solution: Combine one tablespoon of baking soda with one cup of water to create a cleaning solution.
- Apply the solution: Dip an old toothbrush or a small brush into the solution and gently scrub the terminals to remove corrosion and dirt.
- Rinse with water: Carefully rinse the terminals with water, making sure not to let any water enter the battery.
- Dry the terminals: Pat the terminals dry with a clean cloth or let them air dry.
- Apply a protective layer: You can apply a thin layer of dielectric grease or petroleum jelly to the terminals to prevent future corrosion.
Once you’ve taken these safety precautions, inspected your battery, and cleaned the terminals, you’re all set to connect your charger and bring that gel battery back to life! Remember, a well-prepared battery and a safe charging environment will keep you and your battery happy for years to come.
Alright, folks! You’ve safely prepared your gel battery, and it’s time to charge it up. Let’s dive into the step-by-step guide to charging a gel battery like a pro.
Step-by-Step Guide to Charging a Gel Battery
Charging a gel battery is a piece of cake when you follow these simple steps:
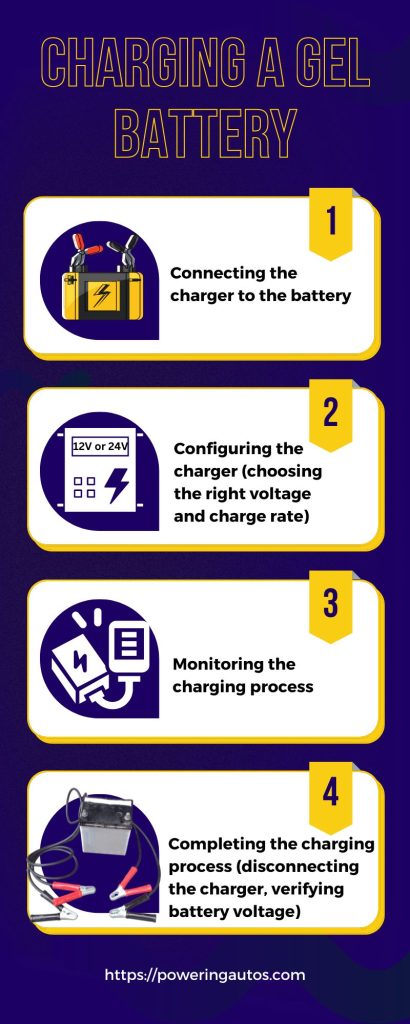
Step-01: Connecting the charger to the battery
- Turn off the charger: Make sure your charger is off before connecting it to the battery.
- Attach the clamps: Connect the positive (red) clamp to the positive terminal of the battery and the negative (black) clamp to the negative terminal.
- Secure the connections: Ensure the clamps are securely fastened to the terminals for a good connection.
Step-02: Configuring the charger
- Select the voltage: Set the charger to the appropriate voltage for your gel battery (usually 12V or 24V).
- Choose the charge rate: Pick a charge rate suitable for your battery’s capacity (refer to the battery manufacturer’s recommendations).
Step-03: Monitoring the charging process
- Watch the charger indicators: Keep an eye on the charger’s LED indicators or display to monitor the charging progress.
- Check the battery temperature: Touch the battery occasionally to ensure it doesn’t get too hot. If it feels too warm, pause the charging process and let it cool down before continuing.
Step-04: Completing the charging process
- Disconnect the charger: Once the charger indicates that the battery is fully charged, turn off the charger and disconnect the clamps.
- Verify the battery voltage: Use a multimeter to check the battery voltage, ensuring it falls within the manufacturer’s recommended range.
And there you have it! You’ve successfully charged your gel battery like a true battery wizard. Just remember to follow these steps, and your gel battery will be ready for action in no time.
You now have a solid grasp of charging your gel battery, but let’s dive deeper into the fascinating world of battery charging stages. Trust me, it’s more exciting than it sounds!
Gel Battery Charging Stages
Let’s get up close and personal with the four stages of battery charging and see how they impact your gel battery’s health and longevity.
A. In-depth examination of the four stages of battery charging
- Bulk stage: This is where the magic happens! The charger pumps in current at a constant rate, raising the battery voltage. The battery slurps up around 80% of its capacity during this stage.
- Absorption stage: As the battery reaches its “full” state, the charger begins to reduce the current flow, allowing the battery to absorb the remaining 20% of its capacity. Think of it as your battery’s dessert course.
- Float stage: At this point, your battery is full, but the charger maintains a constant voltage, providing a small current to counteract self-discharge. It’s like an after-dinner mint to keep your battery fresh.
- Equalization stage: This stage is specific to some chargers, and it’s like a spa day for your battery. The charger applies a slightly higher voltage, helping to balance the cells and remove sulfate crystals from the plates.
B. Importance of each stage for battery health and longevity
Each charging stage plays a vital role in maintaining your gel battery’s health and longevity:
- The bulk stage is essential for quickly replenishing the battery’s energy, especially after deep discharges.
- The absorption stage ensures a full charge and prevents overcharging, which can damage the battery.
- The float stage keeps your battery topped up and ready to use, so you’re never left in the dark.
- The equalization stage (if applicable) helps maintain the overall health of your battery, prolonging its life.
C. Monitoring and managing each charging stage effectively
To get the most out of your gel battery, it’s crucial to monitor and manage each charging stage effectively:
- Choose a smart charger that automatically manages the charging stages for optimal results.
- Keep an eye on battery voltage and current flow to ensure the charger is working as it should.
- Check the battery temperature during charging. A hot battery could indicate issues with the charging process.
- Perform regular maintenance on your battery, such as cleaning terminals and checking electrolyte levels, to ensure it’s ready for each charging stage.
And there you have it! A deeper understanding of the gel battery charging stages that’ll impress even the most seasoned battery experts. With this knowledge, you’ll be the life of the party (or at least the battery-charging party).
Alright, friends, let’s harness the power of the sun! Yup, we’re talking about charging your gel battery using solar panels. This eco-friendly method is gaining popularity, and I’m here to guide you through it.
Charging a Gel Battery with Solar Panels
From using solar panels as an alternative charging method to setting up a solar charging system, we’ve got you covered. Let’s dive in and catch some rays!
Solar panels can be a fantastic and eco-friendly alternative for charging your gel batteries. By converting sunlight into electricity, you’re not only saving money but also helping the environment. It’s a win-win!
Step-by-step guide to setting up a solar charging system
- Choose the right solar panel: Pick a solar panel with a suitable wattage to match your battery’s charging needs.
- Get a solar charge controller: This handy gadget regulates the voltage and current from the solar panel to your gel battery, preventing overcharging and damage.
- Install the solar panel: Find a sunny spot, and securely mount the solar panel, ensuring it’s properly angled to catch maximum sunlight.
- Connect the solar charge controller: Wire the solar panel to the solar charge controller, following the manufacturer’s guidelines.
- Attach the battery: Connect the solar charge controller to your gel battery, observing correct polarity by connecting positive to positive and negative to negative.
- Monitor and maintain: Keep an eye on the charging process, and perform regular maintenance on your solar charging system, such as cleaning the solar panels and checking connections.
Pros and cons of solar energy for battery charging
| Pros | Cons |
|---|---|
| Eco-friendly: Harnesses renewable energy, reducing your carbon footprint | Weather-dependent: Charging efficiency can be affected by cloudy or rainy days |
| Cost-effective: Save on electricity bills in the long run | Initial investment: Solar panels and related equipment can be pricey upfront |
| Low maintenance: Solar panels require minimal upkeep | Space requirements: Solar panels need adequate space for installation |
| Silent operation: No noisy generators needed | Complexity: A solar charging system may be more complex to set up compared to traditional charging methods |
Solar charging is an excellent choice for the environmentally conscious and those looking to save on energy costs in the long run. Just make sure you’re prepared to invest in the right equipment and have a suitable space for installation.
Now that we’ve covered the ins and outs of charging gel batteries, let’s address some common charging issues that might come up. After all, even the most experienced battery whisperer (like yours truly) can encounter some hiccups along the way!
Troubleshooting Common Charging Issues
From overheating to chargers not recognizing batteries, I’ve got you covered with some helpful tips and tricks. Let’s dive in and tackle these issues head-on!
A. Addressing overheating during charging
Overheating during the charging process can lead to reduced battery life and even pose safety hazards. Here’s what you can do to keep things cool:
- Ensure proper ventilation: Make sure the charging area is well-ventilated and free of debris or obstructions.
- Check the charger: Inspect the charger for damage or malfunction. A faulty charger can cause excessive current flow and heat generation.
- Monitor the charging rate: Make sure you’re using the correct charging rate for your gel battery. Overcharging can cause overheating.
- Inspect the battery: Look for any signs of damage, swelling, or leaks, which can lead to overheating during charging.
B. Dealing with a battery not holding a charge
If your gel battery isn’t holding a charge, it’s time to put on your detective hat and investigate:
- Examine the battery terminals: Dirty or corroded terminals can prevent proper charging. Clean them with a wire brush and some baking soda solution.
- Check the electrolyte level: Low electrolyte levels can cause poor charging performance. Top up with distilled water if necessary.
- Inspect the charger: Make sure your charger is functioning correctly and providing the right voltage and current for your gel battery.
- Test the battery: Use a battery tester or multimeter to measure the battery’s voltage and capacity. If it’s significantly lower than the rated capacity, it might be time for a replacement.
C. Resolving issues with a charger not recognizing the battery
If your charger isn’t recognizing your gel battery, here are some steps to help you troubleshoot:
- Verify compatibility: Ensure that your charger is compatible with gel batteries. Some chargers may only work with specific battery types.
- Check the battery voltage: A severely discharged battery may not be recognized by the charger. Use a multimeter to measure the battery voltage and, if necessary, try charging with a different charger or jump-starting the battery.
- Inspect the charger connections: Make sure the charger is properly connected to the battery, with the clamps securely attached to the terminals.
- Examine the charger: Look for any signs of damage or malfunction that could be preventing it from recognizing the battery. If you suspect a faulty charger, try using a different charger or consult the manufacturer for assistance.
By following these troubleshooting tips, you’ll be well-equipped to handle common charging issues like a pro. And remember, when in doubt, always consult the manufacturer’s guidelines or seek professional assistance.
As a wise battery guru, I always say, “With great power comes great responsibility.” And that’s especially true when it comes to maintaining and charging gel batteries. So, let’s dive into some tips and best practices for keeping your gel batteries in tip-top shape!
Gel Battery Charging Tips and Best Practices
From regular maintenance to proper storage, I’m going to share my wealth of knowledge (and witty humor) to help you get the most out of your gel batteries.
A. Regular maintenance for optimal performance
Just like you’d get a check-up at the doctor’s, your gel battery needs a little TLC to stay healthy. Here’s what to do:
- Clean the terminals: Remove any dirt, grease, or corrosion using a wire brush and a baking soda solution.
- Inspect the battery: Look for signs of damage, swelling, or leaks. Address any issues promptly to avoid further problems.
- Check electrolyte levels: While gel batteries are sealed, it’s still a good idea to check for any signs of electrolyte leakage or irregularities.
- Test the battery: Use a multimeter or battery tester to measure the battery’s voltage and capacity. This will help you keep an eye on its overall health.
B. Preventing over-discharging
Over-discharging can shorten your gel battery’s lifespan, so let’s talk about how to prevent it:
- Monitor usage: Keep track of your battery’s discharge rate and avoid deep discharges whenever possible.
- Use a battery monitor: Invest in a battery monitor to help you track your battery’s state of charge and prevent over-discharging.
- Set discharge limits: Some devices allow you to set a discharge limit, which can help prevent over-discharging and protect your battery’s lifespan.
C. Proper storage techniques for gel batteries
When it comes to storing gel batteries, I’m a firm believer in the saying, “Out of sight, out of mind… but in a good way!” Here’s how to store your gel batteries properly:
- Store in a cool, dry place: Gel batteries should be stored in a cool, dry area, away from direct sunlight or extreme temperatures.
- Charge before storage: Make sure your battery is fully charged before storing it. A partially charged battery can lead to sulfation and reduced capacity.
- Check the battery periodically: Even when in storage, check your battery’s voltage every few months to ensure it’s maintaining a proper charge.
- Use a trickle charger: A trickle charger can help maintain the battery’s charge while in storage, preventing sulfation and extending its life.
By following these tips and best practices, you’ll be well on your way to becoming a true gel battery aficionado, just like me! Keep your batteries happy, and they’ll keep powering your world.
Conclusion
There you have it, folks! By following the tips and best practices we’ve discussed, you’ll be able to optimize the performance and longevity of your gel batteries. Remember, regular maintenance, proper charging techniques, and suitable storage are essential to keeping your batteries in peak condition. With a little care and attention, your gel batteries will serve you well for years to come. So, go forth and conquer the battery world with your newfound knowledge, and remember to always have a little fun while doing it!
In addition to the valuable information provided here, there are numerous other aspects of battery care and maintenance that can further enhance your experience. For example, you can learn about how to charge your BMW battery or how to charge your car battery while parked. If you’re looking to expand your knowledge on testing batteries, you can also check out our guide on how to check battery amps with a multimeter.
Warranties are another crucial aspect of battery care, so take a look at our article on how to check if your car battery is under warranty to ensure you’re always covered. And finally, for those who want to dive even deeper into battery testing, our guide on how to load test a battery is a must-read.
By exploring these resources and applying the tips and best practices we’ve discussed, you’ll be well on your way to becoming a battery expert. Keep on learning, and don’t forget to have fun along the way!
FAQ
1. What is the ideal charging voltage for a gel battery?
Answer: The ideal charging voltage for a gel battery typically falls within the range of 13.8 to 14.1 volts. However, it’s essential to follow the manufacturer’s recommendations, as charging voltage may vary depending on the specific battery model and brand.
2. Can I use a regular lead-acid battery charger to charge a gel battery?
Answer: While some chargers are compatible with both lead-acid and gel batteries, using a charger designed specifically for lead-acid batteries can lead to overcharging and reduced battery life in gel batteries. It is best to use a charger explicitly designed for gel batteries to ensure proper charging and battery longevity.
3. How long does it typically take to charge a gel battery?
Answer: The charging time for a gel battery depends on its capacity (measured in amp-hours) and the charging current provided by the charger. To calculate the approximate charging time, divide the battery’s capacity by the charger’s current output and add an additional 10-20% to account for efficiency losses. For example, a 100 amp-hour gel battery charged with a 10-amp charger would take roughly 11 to 12 hours to charge fully.
4. Can gel batteries be used in parallel or series configurations?
Answer: Yes, gel batteries can be connected in parallel or series configurations, depending on your power and voltage requirements. When connecting in parallel, the battery capacity (amp-hours) increases while the voltage remains the same. In a series configuration, the voltage increases while the capacity stays the same. It’s crucial to use identical batteries with the same age and state of charge for optimal performance in both configurations.
5. What is the average lifespan of a gel battery?
Answer: Gel batteries generally have a longer lifespan compared to traditional lead-acid batteries due to their maintenance-free design and resistance to sulfation. On average, a high-quality gel battery can last between 5 to 10 years, depending on factors such as usage, charging habits, and operating conditions. Proper maintenance and adherence to the manufacturer’s charging guidelines can help extend the battery’s life further.