If your battery is running low and you’re looking for a way to give it a boost, you may be considering wiring an alternator to charge the battery. This can be a great way to get your battery back up and running, but it’s important to know a few things before you get started. In this article, we’ll walk you through the process of wiring an alternator to charge a battery, so you can get your car back on the road in no time.
So, how to wire an alternator to charge a battery?
To wire an alternator to charge a battery, you will need to connect the positive terminal of the battery to the positive terminal of the alternator, and then connect the negative terminal of the battery to the negative terminal of the alternator.
Let’s dig into it and see if we can figure it out.
Can I Wire My Alternator Directly To My Battery?
No, you cannot straight wire your alternator directly to your battery. You will need to attach a cable directly to the positive side of the battery from the alternator output post. This is because when heavy electrical demands are placed on the alternator, the battery will help the alternator to produce full output.
Furthermore, You will need to attach a cable directly to the positive side of the battery from the alternator output post. This will allow the alternator to produce full output from the battery when heavy electrical demands are placed on it.
How Do You Hook Up An Alternator To Charge A Battery?
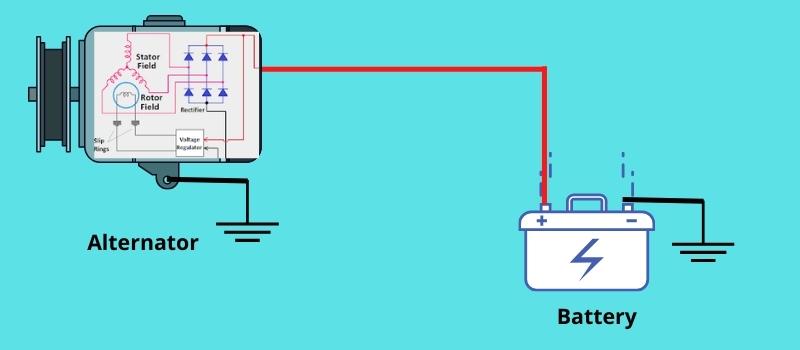
An alternator is a device that converts mechanical energy into electrical energy. Alternators are used in motor vehicles to generate the electricity needed to power the vehicle’s lights, accessories, and other electrical components. An alternator wiring diagram is a drawing that shows how the alternator’s components are interconnected. By studying an alternator wiring diagram, you can learn how the alternator works and how to wire it properly. So, let’s take a look at an alternator wiring diagram and learn what it all means.
If you’re looking to charge a battery with an alternator, there are a few things you’ll need to do.
- Step-01: The first step is to identify all of the various wires that are connected to the alternator.
- Step-02: Once you have identified all of the wires, you will need to determine which one is the “exciter” wire. This is the wire that is connected to the “L” terminal on the alternator and is used to turn on the voltage regulator.
- Step-03: Next, you will need to identify the positive and negative cables. These are the small wires that are connected to the respective terminals of the battery.
- Step-04: The “battery charging wire” is also connected to the alternator. This wire is responsible for charging the battery, and does not supply energy to any other unit.
- Step-05: Finally, the alternator has an “ignition input” wire that is connected from the alternator to the key switch. This wire turns on the voltage regulator.
What Alternator Wire Charges The Battery?
The alternator is a key component in your car’s electrical system, converting the mechanical energy from the engine into electrical energy that can be used to power the vehicle’s lights, accessories, and other electrical devices. The alternator is also responsible for charging the car’s battery, which provides power to the starter motor and other electrical components when the engine is not running.
The charging system in most cars consists of five main components: the alternator, the battery, the voltage regulator, the charging system warning light, and the charging system fuse. The alternator is powered by the engine and produces alternating current (AC) electricity. This AC electricity is converted to direct current (DC) by the rectifier, which is a group of six diodes located inside the alternator. The DC electricity is then used to charge the battery and power the car’s electrical system.
The battery provides power to the starter motor, which starts the engine, and to the car’s electrical system when the engine is not running. The voltage regulator controls the alternator output and prevents the battery from being overcharged. The charging system warning light comes on if there is a problem with the charging system. The charging system fuse protects the car’s electrical system from damage if there is a problem with the charging system.
The alternator output is connected to the battery through the charging system. The charging system includes the alternator, the battery, the voltage regulator, the charging system warning light, and the charging system fuse. The charging system charges the battery and powers the car’s electrical system.
The charging system has five wires: the power wire from the fuse box, the alternator output wire, the ground wire, the battery wire, and the voltage regulator wire. The power wire from the fuse box provides power to the alternator. The alternator output wire carries the alternator output current to charge the battery. The ground wire provides a path for the electrical current to flow from the alternator to the battery. The battery wire carries the battery current to the voltage regulator. The voltage regulator wire carries the voltage regulator voltage to the charging system warning light.
An additional, Another wire (the green wire) goes from the regulator to the “exciter” winding on the alternator. This wire is what turns the alternator on when you start the car. The remaining three wires are the stator windings. These are the three heavy wires that are wrapped around the inside of the alternator case.. They are what generate the electricity that the alternator produces.
The alternator has five wires connected to it. One wire, the solid white wire, carries the alternator output current to charge the battery. Another wire, the green wire, goes from the regulator to the “exciter” winding on the alternator. This wire turns the alternator on when you start the car. The remaining three wires are the stator windings. These are the three heavy wires that are wrapped around the inside of the alternator case. They generate the electricity that the alternator produces.
What Are The Two Small Wires On An Alternator?
The two small wires on an alternator are connected to the positive and negative terminals of the battery. The alternator also has a connection with the battery charging wire. These wires help to keep the battery charged and provide power to the electrical system when the engine is running.
As well as that, The battery in a car has two cables connected to it, the positive and negative. The alternator is also connected to the battery with a wire. The positive cable has a plus sign on it and the negative has a minus sign. When the car is turned on, the battery provides power to the engine to start the car. The alternator then takes over and provides power to the car while it is running.
Where Is The Best Place To Find A Three Pin Alternator Wiring Diagram?
There are a few places that you can find a three pin alternator wiring diagram. The first place to check would be your local auto parts store. They should have a variety of diagrams available for you to look at. Another place to check would be an online search engine such as Google.
How Do I Wire A Battery, Starter, And Alternator Together?
If you’re asking this question, then you’re probably not a professional mechanic. But that’s okay! We all have to start somewhere. Wiring a battery, starter, and alternator together is actually not that difficult. Here’s a quick rundown of what you need to do:
- 1. Disconnect the negative terminal of the battery.
- 2. Connect the red wire from the alternator to the positive terminal of the battery.
- 3. Connect the black wire from the starter to the negative terminal of the battery.
- 4. Connect the red wire from the starter to the positive terminal of the battery.
- 5. Connect the black wire from the alternator to the negative terminal of the battery.
- 6. Reconnect the negative terminal of the battery.
And that’s it! You’ve now successfully wired a battery, starter, and alternator together.
What Is A 2 Pin Alternator Wiring Diagram?
A 2 pin alternator wiring diagram is a diagram that shows how a two-pinned alternator is wired. Alternators are devices that create alternating current (AC) by using a spinning magnet to convert mechanical energy into electrical energy. A two-pinned alternator has two output terminals, which are used to connect the alternator to the electrical system of a vehicle. The output from a two-pinned alternator is typically lower than that of a three-pinned or four-pinned alternator, but it can be increased by adding more magnets to the rotor.
What Is The 4 Pin Alternator Wiring Diagram?
The 4 pin alternator wiring diagram is a drawing that shows how the alternator is wired. The diagram shows the alternator as a rectangle with four terminals. The top terminal is the positive terminal, and the bottom terminal is the negative terminal. The left and right terminals are the exciter terminals. The exciter terminals are used to turn on the alternator.
What Is An Alternator Wire To Starter Or Battery?
An alternator wire is a cable that connects the alternator to the starter or battery. The purpose of the alternator wire is to provide power to the starter or battery so that the engine can start. Alternator wires are made from a variety of materials, including copper, aluminum, and stainless steel.
How To Wire An Alternator With Internal Regulator?
If you’re looking to wire an alternator with an internal regulator, there are a few things you’ll need to keep in mind. First, make sure that the alternator is compatible with the internal regulator. Second, identify the positive and negative terminals on the alternator. Finally, connect the positive and negative terminals to the corresponding terminals on the internal regulator.
Assuming you have a compatible alternator and regulator, the next step is to identify the positive and negative terminals on the alternator. The positive terminal is typically labeled with a “+” sign, while the negative terminal is typically labeled with a “-” sign. Once you’ve located the terminals, use a wrench to loosen the nuts that secure the terminals to the alternator.
Now, it’s time to connect the positive and negative terminals to the corresponding terminals on the internal regulator. The positive terminal on the alternator should be connected to the positive terminal on the regulator, and the negative terminal on the alternator should be connected to the negative terminal on the regulator. Once the connections are made, tighten the nuts that secure the terminals in place.
That’s all there is to it! By following these simple steps, you can easily wire an alternator with an internal regulator.
What Does W Mean On An Alternator?
The “W” on an alternator stands for “wraparound”. The wraparound design feature on an alternator allows the alternator to be easily mounted on a variety of vehicles. The “W” also indicates that the alternator has a wide range of operating speeds.
What Tells The Alternator To Charge?
The alternator is a critical part of your car’s electrical system, and it is responsible for charging the battery. When the engine is running, the alternator produces electricity that is used to power the car’s lights, accessories, and other electrical components.
The alternator is regulated by the car’s computer, which tells it when to charge the battery. The computer takes into account the amount of electrical load on the car, the state of the battery, and other factors. When the computer determines that the battery needs to be charged, it sends a signal to the alternator to begin charging.
What Will Happen If You Make Wrong Connections To The Alternator Or Regulator?
If you connect the alternator or regulator incorrectly, you may cause damage to your vehicle. In some cases, you may even void your warranty.
What Wires Go Where On Alternator?
If you’re wondering what wires go where on your alternator, you’ve come to the right place. We’ll go over the basics of how to wire an alternator, and what the various wire colors mean.
The first thing you need to know is that there are generally three wires that need to be attached to your alternator: the positive (or “+”) terminal, the negative (or “-“) terminal, and the ground wire.
The positive terminal is usually red, and it goes to the battery positive terminal. The negative terminal is usually black, and it goes to the battery negative terminal. The ground wire usually goes to a bolt or screw on the engine block.
Now, let’s talk about the various wire colors. The most common wire colors are red, black, and green.
Red wires are typically used for the positive terminal, black wires are typically used for the negative terminal, and green wires are typically used for the ground wire.
However, it’s important to note that these colors are not always used. Some alternators may have different colored wires, so it’s always best to check your manufacturer’s instructions to be sure.
Now that you know the basics of how to wire an alternator, you’re ready to get started on your own car. Just be sure to follow the manufacturer’s instructions carefully, and always use caution when working with electrical wires.
Final Word
In conclusion, remember that the proper way to wire an alternator to charge a battery is by connecting the positive terminal of the battery to the output terminal of the alternator, and the negative terminal of the battery to the ground terminal of the alternator. If you have any questions, be sure to consult a professional mechanic.
Related Post: