To wire a radiator fan directly to a battery, start by disconnecting the battery for safety. Locate the radiator fan and disconnect it. Prepare a 12-gauge jumper wire and connect one end to the cooling fan’s positive wire. Extend the other end of the jumper wire to the positive terminal of the battery. When the wire touches the positive terminal, the fan should start. This method allows for direct control of the radiator fan, bypassing any faulty switches or relays. Always remember to reconnect the battery after the process.
In the world of automobiles, the radiator fan plays a crucial role in maintaining the engine’s temperature. It’s a silent hero, working tirelessly behind the scenes to keep your vehicle running smoothly.
But what happens when the fan’s operation is hindered due to a faulty switch or relay? The solution might be simpler than you think – wiring the radiator fan directly to the battery. This approach not only bypasses any potential issues with switches or relays but also gives you direct control over the fan’s operation.
In this blog post, I will guide you through the process of wiring a radiator fan directly to a battery, ensuring your vehicle’s engine remains cool and efficient. So, let’s dive in and explore this practical, hands-on solution to a common automotive challenge.
What You Need to Know About Radiator Fans?
The radiator fan, also known as the engine cooling fan, plays a crucial role in maintaining the optimal temperature of your vehicle’s engine. It’s designed to facilitate the movement of air through the radiator, especially when the vehicle is stationary or moving at a slower speed. This airflow helps dissipate the heat generated by the engine, using the radiator as a conductor.
When your vehicle is in motion, air naturally flows into the front grill and through the radiator, providing up to 95% of the cooling effect. However, when the vehicle is idling or moving slowly, this natural airflow is insufficient. That’s where the radiator fan comes in, providing the extra airflow needed to prevent the engine from overheating.
Different types of radiator fans: Mechanical vs. Electric
There are two main types of radiator fans: mechanical and electric.
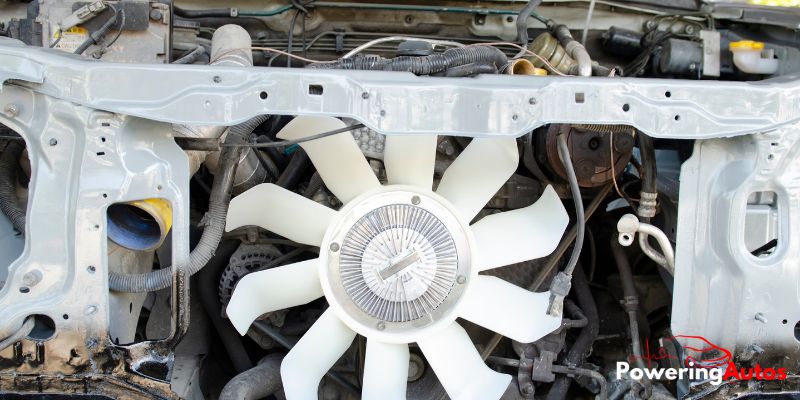
Mechanical Radiator Fans: Commonly found in older, rear-wheel-drive vehicles, mechanical radiator fans are directly connected to the engine via drive pulleys. They are governed by a thermal fan clutch that senses the heat in the radiator and activates the fan when the engine temperature rises. The fan clutch can disengage when not in use and re-engage with the help of expanding grease when heated.
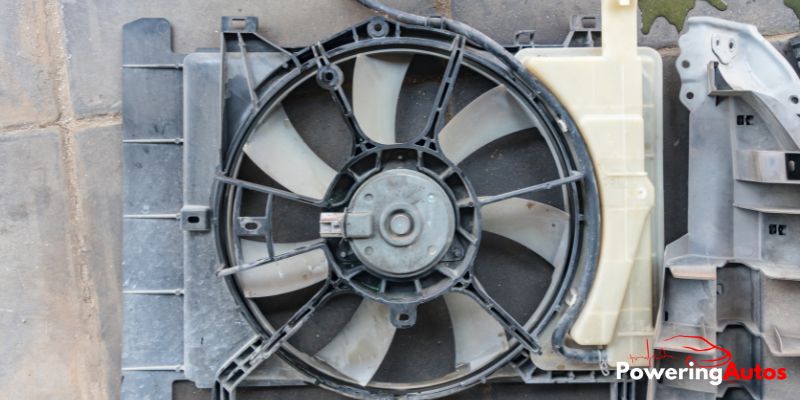
Electric Radiator Fans: Modern vehicles predominantly feature electric radiator fans, which are powered by an electric motor. The operation of these fans is controlled by the engine’s microprocessor, which activates the fan based on the vehicle’s temperature. Electric fans are often used in both rear and front-wheel-drive cars.
Understanding the function and types of radiator fans is essential for any car owner. Not only does it help you make informed decisions about your vehicle, but it also allows you to detect potential issues early, preventing costly repairs and ensuring the longevity of your vehicle.
Why Wire a Radiator Fan Directly to the Battery?
Wiring a radiator fan directly to the battery has several advantages. First, it provides a constant power source, ensuring that the fan can operate independently of the vehicle’s electrical system. This can be particularly beneficial in situations where the vehicle’s electrical system is under heavy load or experiencing issues.
Second, it allows for more precise control over the fan’s operation. By wiring the fan directly to the battery, you can use a manual switch or a temperature switch to control when the fan turns on and off. This can be useful for managing engine temperature more effectively, especially in high-performance or heavy-duty applications.
Potential drawbacks and precautions
While there are benefits to wiring a radiator fan directly to the battery, there are also potential drawbacks and precautions to consider. One of the main concerns is the risk of draining the battery. If the fan is left running for extended periods without the engine running, it could potentially drain the battery, leaving you unable to start your vehicle.
Additionally, wiring the fan directly to the battery bypasses the vehicle’s electrical system, which can lead to safety issues. For example, if the fan’s wiring or motor were to short out, it could potentially cause a fire. Therefore, it’s crucial to use a fuse or circuit breaker to protect the circuit and to ensure that the wiring and connections are secure and properly insulated.
Lastly, it’s important to remember that not all radiator fans are designed to be wired directly to the battery. Some fans are designed to be controlled by the vehicle’s computer and may not function correctly or safely if wired directly to the battery. Therefore, it’s always important to check the fan’s specifications and consult with a professional if you’re unsure.
Tools and Materials Needed
Before we dive into the process of wiring a radiator fan directly to the battery, it’s important to gather all the necessary tools and materials. Trust me, there’s nothing more frustrating than starting a project only to realize halfway through that you’re missing a crucial tool or piece of equipment. So, let’s avoid that headache, shall we?
Here’s a list of the tools and materials you’ll need for this task:
- 12-Gauge Wire: This will serve as the main conduit for power from the battery to the radiator fan. It’s thick enough to handle the current without overheating.
- Wire Cutters/Strippers: You’ll need these to cut and strip the insulation from the ends of the wire.
- Electrical Connectors: These are used to securely connect the wire to the fan and the battery. Make sure to get the right size for the wire and the terminals on your fan and battery.
- Electrical Tape or Heat Shrink Tubing: This is used to insulate the connections and prevent short circuits.
- Fuse or Circuit Breaker: This is a crucial safety component that will protect the circuit from overcurrent situations.
- Switch (Optional): If you want to manually control the fan, you can install a switch in the circuit. This can be a simple toggle switch or a temperature-controlled switch that activates the fan at a certain engine temperature.
- Multimeter (Optional): While not strictly necessary, a multimeter can be very useful for troubleshooting if things don’t work as expected.
Remember, safety should always be your top priority when working with electrical systems. Always disconnect the battery before starting work, and consider wearing protective gloves and eyewear. Now, with all your tools and materials in place, you’re ready to start wiring your radiator fan directly to the battery. Let’s get to it!
Step-by-Step Guide: How to Wire a Radiator Fan Directly to the Battery
Alright, folks, it’s time to roll up our sleeves and get down to business. Here’s a step-by-step guide on how to wire a radiator fan directly to the battery. Don’t worry, I’ll walk you through each step, making sure you’re confident and ready to tackle this task. Let’s get started!
Step 1: Disconnect the Battery
Safety first, my friends! Before we start messing with any wiring, we need to disconnect the battery. This will prevent any accidental sparks or short circuits while we’re working. Simply loosen the nut on the negative battery terminal and remove the cable. Easy peasy!
Step 2: Locate and Disconnect the Radiator Fan
Next, we need to locate the radiator fan. It’s usually mounted on the back of the radiator. Once you’ve found it, disconnect the wiring harness that connects it to the vehicle’s electrical system. This might require a bit of gentle wiggling and pulling, but be patient—you don’t want to damage the connector.
Step 3: Prepare the Wiring
Now, it’s time to prepare our 12-gauge wire. Cut a length of wire that’s long enough to reach from the fan to the battery, plus a little extra for good measure. Strip about half an inch of insulation from each end of the wire. This is where our wire strippers come in handy!
Step 4: Connect the Fan to the Battery
We’re almost there! Connect one end of the wire to the positive wire on the fan using an electrical connector. Make sure the connection is secure. Then, connect the other end of the wire to the positive terminal of the battery. Remember to include a fuse or circuit breaker in the circuit for safety.
Step 5: Test the Fan
Finally, the moment of truth. Reconnect the battery, start the engine, and check if the fan is working. If you’ve installed a switch, turn it on and see if the fan starts running. If everything is working as it should, give yourself a pat on the back—you’ve successfully wired your radiator fan directly to the battery!
Remember, this guide is a general overview, and the exact steps may vary depending on your specific vehicle and fan setup. If you’re ever unsure or uncomfortable performing any of these steps, don’t hesitate to consult with a professional. Safety and accuracy are paramount in any DIY project. Happy wiring!
Additional Tips for Wiring a Radiator Fan to the Battery
Now that we’ve gone through the main steps of wiring a radiator fan directly to the battery, let’s discuss some additional tips that can help ensure a successful and safe installation. After all, the devil is in the details, right?
Safety precautions
Safety should always be your top priority when working with electrical systems. Here are some safety precautions to keep in mind:
- Disconnect the Battery: Always disconnect the battery before starting any electrical work on your vehicle. This will prevent accidental sparks or short circuits.
- Use Proper Tools: Always use the right tools for the job. This not only makes the work easier but also reduces the risk of accidents.
- Wear Protective Gear: Consider wearing protective gloves and eyewear to protect yourself from potential sparks or sharp objects.
- Check Connections: Make sure all electrical connections are secure and properly insulated to prevent short circuits.
- Include a Fuse: Always include a fuse or circuit breaker in the circuit. This will protect the circuit from overcurrent situations, which could potentially cause a fire.
Maintenance tips
Once you’ve successfully wired your radiator fan to the battery, here are some maintenance tips to ensure it continues to operate effectively:
- Regular Checks: Regularly check the fan and wiring for any signs of damage or wear. If you notice any issues, address them immediately to prevent further problems.
- Clean the Fan: Keep the fan clean to ensure it operates efficiently. Dust and debris can hinder the fan’s performance.
- Check the Battery: Regularly check the battery to ensure it’s not being drained by the fan. If you notice the battery is draining quickly, you may need to reconsider your fan setup.
- Professional Inspection: Consider having a professional inspect the fan and wiring periodically. They can spot potential issues that you may miss.
Remember, a little bit of prevention goes a long way. By following these safety and maintenance tips, you can enjoy the benefits of wiring your radiator fan directly to the battery while minimizing potential risks. Happy driving!
Conclusion
Wiring a radiator fan directly to the battery can be a practical solution to keep your engine cool and running efficiently, especially when dealing with a faulty relay or switch. While it may seem like a daunting task, with the right tools, materials, and a step-by-step guide, it’s a task that can be tackled by any DIY enthusiast.
Remember, safety should always be your top priority when working with electrical systems. Always disconnect the battery before starting, use the right tools, and don’t hesitate to consult with a professional if you’re unsure about any step in the process.
Moreover, regular maintenance and checks are crucial to ensure the longevity of your setup. Keep the fan clean, check the battery regularly, and consider a professional inspection periodically.
In the world of DIY automotive maintenance, understanding how to wire a radiator fan directly to the battery is a valuable skill. It not only enhances your knowledge of your vehicle’s cooling system but also empowers you to take control of your vehicle’s performance.
If you’re interested in learning more about battery-related maintenance and troubleshooting, we have a wealth of resources available. For instance, you might find our guide on how to change a golf cart battery useful if you’re dealing with a similar task.
If you’re looking to enhance your vehicle’s electrical system further, consider reading our article on how to hook up a battery isolator. This can be particularly beneficial for those of you who use additional electrical equipment in your vehicle.
And for those moments when you need to leave your trunk open for extended periods, our guide on how to leave the trunk open without draining the battery can be a lifesaver.
If you’re facing issues with your key fob after replacing the battery, our article on how to reprogram a key fob after replacing the battery can help you resolve this issue.
Lastly, if you’re a motorcycle enthusiast, our guide on how to tell if a motorcycle battery is bad can help you keep your ride in top shape.
Remember, knowledge is power, especially when it comes to maintaining and enhancing your vehicle. Happy reading, and safe driving!
FAQ
Is it safe to wire a radiator fan directly to the battery?
Yes, it is safe to wire a radiator fan directly to the battery, but it should be done with caution. It’s important to use a fuse in the circuit to prevent potential electrical issues. Always disconnect the battery before starting the wiring process to avoid any accidental short circuits.
What are the benefits of wiring a radiator fan directly to the battery?
Wiring a radiator fan directly to the battery can provide continuous cooling, even when the engine is off. This can be beneficial in preventing overheating, especially in hot weather or when the vehicle is stationary for extended periods. It also bypasses any faulty switches or relays in the original wiring.
Can I wire the radiator fan to the ignition switch instead of the battery?
Yes, you can wire the radiator fan to the ignition switch. This means the fan will only operate when the ignition is on, preventing the fan from draining the battery when the car is off. However, this setup won’t provide cooling when the engine is off, which might be necessary in certain situations.
What tools do I need to wire a radiator fan directly to the battery?
To wire a radiator fan directly to the battery, you’ll need a few basic tools: wire cutters, wire strippers, a set of screwdrivers, electrical tape, and connectors. A multimeter can also be useful for testing the connections. Always remember to disconnect the battery before starting the work to ensure safety.
How can I test if the radiator fan is working after wiring it to the battery?
After wiring the radiator fan to the battery, you can test its operation by simply turning on the vehicle and checking if the fan spins. For a more thorough test, you can use a multimeter to check the voltage at the fan connector. It should read around 12 volts when the fan is powered. If the fan doesn’t spin or the voltage is off, there might be a problem with the wiring or the fan itself.