Yes, most modern outboard motors, especially those with an electric start, do charge your boat’s battery. This is facilitated by an alternator or a stator in the motor that generates electricity when the motor is running. However, the efficiency of the charging process can depend on factors like the motor’s RPM and the battery’s existing charge level. Regular maintenance of both the motor and the battery can ensure optimal charging.
As someone who’s spent more time on the water than on dry land, I’ve got a tale or two to share about boat motors and batteries. You see, there’s a question that’s been bobbing around in the minds of many a boat owner – “Does my boat motor charge my battery?” Well, I’m here to set your mind at ease.
In my many years of sailing, tinkering with outboards, and swapping sea stories, I’ve learned a thing or two. Most modern outboard motors, particularly those with an electric start, do indeed charge your boat’s battery. It’s a bit like magic, but it’s actually all thanks to a clever bit of kit called an alternator or a stator.
But hold your seahorses, it’s not as simple as it sounds. There are a few factors that can affect this charging process. But don’t worry, we’ll dive into all that and more. So, grab your life vest, and let’s set sail on this journey of discovery together!
How Does a Boat Motor Work?
Now that we’ve covered the basics of boat batteries and their connection to the boat motor, let’s dive deeper into the workings of the boat motor itself. Starting with the basic principles of boat motor operation, we’ll explore how these powerful machines convert fuel into motion, propelling your boat through the water.
Basic principles of boat motor operation
Boat motors, particularly outboard motors, operate on principles similar to car engines but are adapted to the marine environment and the unique challenges of vertical mounting. The pistons inside the motor turn a crankshaft, creating rotational movement that ultimately drives the propeller.
However, since the motor is mounted vertically, this rotational power needs to be turned 90 degrees so that it’s parallel to the water’s surface. This happens below the engine, in the lower unit.
Different types of boat motors and their characteristics
There are two main types of outboard motors: two-stroke and four-stroke. A two-stroke engine utilizes two strokes of the piston inside the cylinder to complete one cycle. As the piston moves down, it exposes an exhaust port that allows exhaust gases to escape.
This creates a low pressure inside the cylinder that allows air and fuel to enter the cylinder through an intake port. A second stroke then moves the piston toward the top of the cylinder, compressing the fuel and air, and igniting them.
On the other hand, a four-stroke engine has separate strokes for intake, compression, combustion, and exhaust. It’s more fuel-efficient, produces less exhaust, and generally requires less maintenance than a two-stroke motor.
The type of motor chosen depends on the specific needs and conditions. For instance, designers might choose a two-stroke configuration to save weight in a low-power outboard, but they’ll usually opt for a four-stroke design in a larger motor.
What Should I Know to Understand Boat Batteries?
Having explored the workings of boat motors, it’s time to shift our focus to another crucial component of your boat’s electrical system – the battery. Let’s start by understanding the different types of boat batteries available and how each one can impact your boating experience.
Types of Boat Batteries
Boat batteries come in three main types: starting (or cranking) batteries, deep cycle batteries, and dual-purpose batteries.
- Starting Batteries: These are designed to deliver a large burst of power for a short time, needed to start the boat’s engine. They have many thin lead plates, which allows for a large surface area that can deliver a lot of currents quickly.
- Deep Cycle Batteries: These batteries are designed to be discharged down to a low level and then recharged many times (deep cycling). They have fewer, thicker lead plates than starting batteries, which makes them less capable of delivering a quick burst of power, but more capable of delivering a steady amount of power over a longer period.
- Dual-Purpose Batteries: As the name suggests, these batteries are designed to function as both starting and deep-cycle batteries. They can deliver a strong burst of power for starting the engine and can also be discharged and recharged many times.
How Boat Batteries Work?
Boat batteries store energy and release it as needed to power various onboard systems. They work through a chemical reaction inside the battery.
When the battery is discharging, the acid in the electrolyte reacts with the materials of the plates, releasing electrons that flow out of the battery and provide power.
On the other hand, when the battery is recharging, the opposite happens: the flow of electrons is reversed, and the chemical reaction at the plates is also reversed, restoring the battery’s charge.
Importance of Battery Maintenance
Proper maintenance of boat batteries is crucial for their longevity and performance. It involves regular inspection and cleaning, ensuring the correct electrolyte levels, and keeping the battery properly charged.
- Regular Inspection and Cleaning: This helps to detect and address any issues early on. It includes checking for any physical damage, corrosion, or loose connections.
- Maintaining Correct Electrolyte Levels: For batteries with removable caps, it’s important to check the electrolyte level regularly and top it up with distilled water if necessary.
- Proper Charging: Batteries should be kept fully charged when not in use. Overcharging or undercharging can damage the battery and reduce its lifespan.
Remember, a well-maintained battery not only lasts longer but also performs more efficiently, saving you time, money, and potential headaches in the long run.
Does My Boat Motor Charge My Battery?
Now that we’ve covered the basics of boat motors and batteries, you might be wondering, “Does my boat motor charge my battery?” Let’s delve into this question and start by explaining how boat motors can indeed charge batteries.
How Boat Motors Can Charge Batteries?
Yes, your boat motor can indeed charge your battery. This is possible due to the alternator that’s typically part of your boat’s motor. When the motor is running, the alternator generates electricity, which is then used to recharge the battery. This is similar to how a car’s alternator charges the car battery while the engine is running.
However, it’s important to note that the effectiveness of this charging process can vary depending on several factors. For instance, if you’re running several high-power appliances on your boat, the alternator might not be able to produce enough electricity to both power those appliances and charge the battery.
Factors That Affect the Charging Process
Several factors can affect the charging process. One of the most significant is the power demand on your boat. If you’re using a lot of power-hungry appliances or equipment, your alternator might struggle to keep up.
The health and age of your battery can also impact the charging process. Older batteries or those that have been poorly maintained may not hold a charge as well as newer, well-maintained ones.
Lastly, the type of motor and its alternator’s capacity will also play a role. Some motors have more powerful alternators than others, which can produce more electricity for charging the battery.
Importance of a Regulator Rectifier in Charging
The regulator rectifier plays a crucial role in the charging process. This component converts the alternating current (AC) produced by the alternator into direct current (DC), which is what your battery uses.
Furthermore, the regulator rectifier also controls the voltage level that’s sent to the battery. This is important because overcharging can damage the battery, while undercharging can leave it drained. Therefore, a properly functioning regulator rectifier is essential for maintaining your battery’s health and ensuring it gets adequately charged.
Remember, while your boat motor does charge your battery, it’s not a substitute for a dedicated battery charger, especially if you’re storing your boat for an extended period. Always ensure your battery is fully charged before storage to prolong its lifespan and ensure it’s ready for your next adventure.
Step By Step Instruction to Charge Your Trolling Battery From Your Outboard Engine
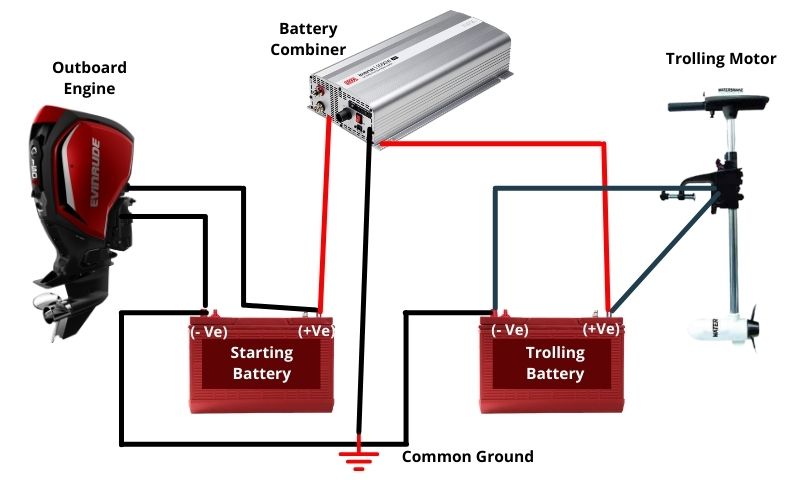
Step-01: Position the battery combiner within two feet of the starter battery. As the combiners are water-resistant, they don’t require shielding and enhance visibility through LED lights that remain unaffected by direct sunlight exposure.
Step-02: Attach one of the red cables to the positive terminal of your starter battery. For a 100-amp connector, you can use both leads interchangeably.
Step-03: Connect the other red lead to the positive terminal of your trolling battery. If you desire to install it at the bow, you’ll typically require an extension cable. All negative terminals must be interconnected using a 12-gauge duplex wire, which is most suitable for this task. Ensure you leave sufficient length on the terminal to avoid short-circuiting.
Step-04: Establish a connection between the negative terminals on both batteries to create a return path for charging currents. This is generally accomplished with the black wire in the duplex cable that links battery-to-battery, or alternatively by establishing an enclosure that safeguards all the connections and wires between them. Be careful to prevent any cable damage, particularly if your boat is metallic!
Step-05: Attach the black terminal lead to the negative terminal of your starter battery. Consider shortening this lead if needed, but be careful not to shorten it excessively, thereby hampering the connection. It’s unnecessary to have long leads, just ensure there’s ample slack for accurate connections.
Step-06: Cut a 2-3 inch segment of green wire and secure it with electrical tape to avert contact. It’s essential to leave some wire available in case you decide to reconnect in the future. This is why it’s important not just to sever the green wires, but also to leave some wire on both ends of your cables, enabling reconnection if needed.
Now, when the engine operates, a light indicates a connection to your trolling battery. Upon engine shut down, the light extinguishes, signifying disconnection to prevent the starter battery from draining while maneuvering waves or currents.
The capacity of an alternator in our boat’s motor system, which powers elements like electronics, to charge trolling battery hinges on the power consumption from other sources. For instance, night fishing lights. If multiple batteries are utilized without an adequate recharge, there may not be a sufficient charge to sustain operations once nightfall descends.
How to Ensure Your Boat Motor Charges Your Battery Efficiently?
Understanding that your boat motor can charge your battery is one thing, but ensuring it does so efficiently is another. So, how can you ensure your boat motor charges your battery efficiently? Let’s start by discussing some regular maintenance tips for both your boat motor and battery.
Regular maintenance tips for boat motor and battery
Regular maintenance is key to ensuring your boat motor charges your battery efficiently. Here are some tips I’ve gathered from my years of experience:
- Check the battery regularly: Regularly inspect your battery for any signs of damage or wear. Look for any corrosion on the terminals and clean them if necessary.
- Keep the battery charged: Don’t let your battery discharge completely. It’s best to keep it at least 50% charged.
- Inspect the wiring: Regularly check the wiring between your boat motor and the battery. Any loose or damaged wires can affect the charging process.
- Check the water levels: If you’re using a lead-acid battery, make sure to check the water levels regularly. If the water level is low, refill it with distilled water.
- Regular engine maintenance: Regularly service your boat motor. A well-maintained engine is more likely to charge the battery efficiently.
Signs that your boat motor is not charging your battery
There are several signs that your boat motor may not be charging your battery efficiently:
- The battery drains quickly: If your battery is draining faster than usual, it could be a sign that the boat motor is not charging it efficiently.
- The boat motor struggles to start: If your boat motor is having trouble starting, it could be because the battery is not being charged properly.
- The battery warning light is on: If your boat has a battery warning light and it’s on, it’s a clear sign that there’s a problem with the charging system.
Solutions for common issues
If you’re facing issues with your boat motor not charging your battery efficiently, here are some solutions:
- Check the alternator: The alternator is responsible for charging the battery while the boat motor is running. If it’s not working properly, it won’t charge the battery.
- Check the voltage regulator: The voltage regulator controls the amount of electricity that flows to the battery. If it’s faulty, it could be overcharging or undercharging the battery.
- Replace the battery if necessary: If your battery is old or damaged, it may not hold a charge well. In this case, it’s best to replace it.
Remember, regular maintenance is key to ensuring your boat motor charges your battery efficiently. Stay vigilant, keep an eye on the signs, and take action when necessary. Happy boating!
Installing a Regulator Rectifier on a Boat Motor
We’ve discussed the importance of the regulator rectifier in the charging process. But what if you need to install a new one on your boat motor? Don’t worry, I’ve got you covered. Let’s walk through a step-by-step guide to installing a regulator rectifier on your boat motor.
Step-by-step guide to installing a regulator rectifier
Installing a regulator rectifier on a boat motor is a straightforward process that you can do yourself with a bit of patience and the right tools. Here’s a step-by-step guide based on my experience and the information I’ve gathered:
- Disconnect the battery: Always start by disconnecting the battery to avoid any accidental short circuits.
- Locate the old regulator rectifier: The regulator rectifier is usually located near the engine and is held in place by two bolts. It has five wires connected to it – two yellows, two reds, and one gray.
- Remove the old regulator rectifier: Remove the bolts holding the regulator rectifier in place and disconnect the wires. Be careful not to damage the connectors.
- Connect the new regulator rectifier: Connect the wires to the new regulator rectifier. Make sure the connections are secure and won’t come loose.
- Secure the new regulator rectifier: Bolt the new regulator rectifier in place. Make sure it’s secure and won’t move around.
- Reconnect the battery and test: Reconnect the battery and start the boat motor to test the new regulator rectifier. Check the voltage to make sure it’s charging the battery correctly.
Safety precautions to consider
When installing a regulator rectifier on a boat motor, safety should be your top priority. Here are some precautions to consider:
- Always disconnect the battery before starting: This will prevent any accidental short circuits.
- Use the right tools: Using the right tools will make the job easier and prevent damage to your boat motor.
- Check the connections: Make sure all connections are secure and won’t come loose.
- Test before use: Always test the new regulator rectifier before taking your boat out on the water.
Remember, if you’re not comfortable doing this yourself, it’s always best to hire a professional. Happy boating!
Conclusion
Understanding how your boat motor charges your battery and how to maintain both is crucial for any boat owner. It’s not just about keeping your boat running smoothly – it’s about ensuring safety and longevity of your equipment.
From the types of boat batteries to the role of a regulator rectifier, every component plays a vital role in your boat’s operation. Regular maintenance, timely troubleshooting, and understanding the signs of potential issues can save you from unexpected breakdowns and costly repairs.
In addition to understanding your boat motor and battery, it’s also important to have a broader knowledge of how different components of your boat’s electrical system work together. For instance, knowing how to charge a boat battery while on water can be a lifesaver in certain situations.
Similarly, being aware of the signs that your alternator is draining your battery can help you prevent potential issues before they become serious problems. And if you’re considering adding a remote starter to your boat, it’s worth understanding whether a remote starter can drain your battery.
If you’re looking to expand your knowledge further, you might also want to learn how to use a DieHard battery charger, or even how to open a Prius trunk with a dead battery.
For those dealing with larger systems, understanding how to jump start a 24V system with a 12V battery can be incredibly useful. And if you’re a hybrid boat owner, knowing how to charge your hybrid battery is essential.
Finally, if you’re considering adding a winch to your boat, make sure you understand how to wire a winch to a battery.
Remember, the more you know, the better prepared you’ll be for any situation that comes your way. Happy boating!
FAQ
What type of battery is best for my boat motor?
The best type of battery for your boat motor depends on your specific needs. Deep cycle batteries are ideal for powering onboard electronics and appliances while starting batteries are designed to provide a quick burst of energy to start the engine. Dual-purpose batteries offer a balance between the two. Always consider factors like power requirements, battery capacity, and the type of boat motor you have when choosing a battery.
How can I tell if my boat motor is charging my battery?
You can tell if your boat motor is charging your battery by using a multimeter. Connect the multimeter to the battery terminals while the boat motor is running. A reading between 13.5 to 14.5 volts typically indicates that the motor is charging the battery. If the voltage is below 13 volts, it may suggest that the battery isn’t being charged.
How often should I charge my boat battery?
The frequency of charging your boat battery depends on its usage. If you use your boat regularly, the motor’s alternator should keep the battery charged. However, if the boat is not used frequently, it’s recommended to charge the battery every 30 days to prevent it from discharging completely. Always monitor the battery’s voltage to ensure it’s within the optimal range.
Can a boat battery be overcharged?
Yes, a boat battery can be overcharged. Overcharging occurs when the battery is exposed to high charging voltages for extended periods, leading to excessive heat and potential damage. This can reduce the battery’s lifespan and performance. It’s important to use a smart charger that can regulate the charging process to prevent overcharging.
What is a regulator rectifier, and why is it important?
A regulator rectifier is a crucial component in a boat’s electrical system. It converts the AC power generated by the boat motor into DC power, which is used to charge the battery and power the boat’s electrical systems. The regulator rectifier also ensures that the voltage doesn’t exceed around 14.5 volts, protecting the battery and other electrical components from damage due to overvoltage.