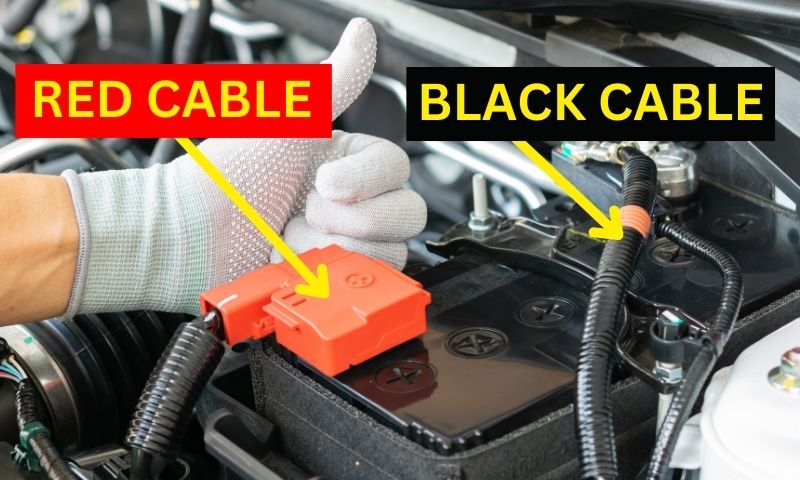
The positive terminal on a car battery is marked with a “+” sign and often has a red cable attached. On the other hand, the negative terminal is marked with a “-” sign, typically connected to a black cable. To ensure safe use, always connect and disconnect cables in the correct order: negative first, then positive.
As someone who’s been tinkering with cars for more years than I’d like to admit, I can’t stress enough the importance of understanding car battery polarity. It may seem like a no-brainer, but trust me, even seasoned gearheads can make a slip-up, and the results can be, well, shocking.
In this blog post, we’re going to dive deep into the world of car battery polarity. I’ll walk you through the nitty-gritty of why knowing the positive and negative sides of a car battery is crucial, the potential hazards of incorrect battery connections, and our main goal—making sure you never make that rookie mistake.
Did you know that reversing the battery connections can lead to a whole host of issues, including damage to your vehicle’s electrical components and even electrical fires? Yikes! That’s why it’s essential to understand the difference between the positive and negative terminals on a car battery, so you can keep your ride running smoothly and safely.
So, buckle up, my friends, because we’re about to embark on an electrifying journey! Together, we’ll ensure that you have the knowledge and confidence to handle your car battery like a pro. Let’s get started.
Remember, knowledge is power—literally, in this case!
Understanding Car Battery Polarity
Alright, now that we’ve charged up our enthusiasm, let’s shift gears and cruise into our main topic—Understanding Car Battery Polarity. You might be thinking, “Why should I care about polarity? I’m not a mechanic!” But trust me, even if you’re not planning on opening your own auto shop, it’s essential knowledge for any car owner.
Before we hit the road, let’s make a quick pit stop and discuss What is polarity? and The significance of positive and negative terminals. Knowing your way around battery polarity will have you navigating the world of batteries like a pro, so buckle up and enjoy the ride.
A. What is polarity?
Polarity refers to the direction of an electrical current. In the case of car batteries, polarity is crucial because it determines how the current flows between the positive and negative terminals. Picture this: you have a dead battery, and it’s time to bring out the trusty jumper cables. Connecting them the wrong way could lead to a whole lot of trouble, from damage to your vehicle to a shocking experience (literally!).
B. The significance of positive and negative terminals
Understanding the positive and negative terminals on your battery isn’t just for show—it’s the key to keeping your engine purring like a kitten.
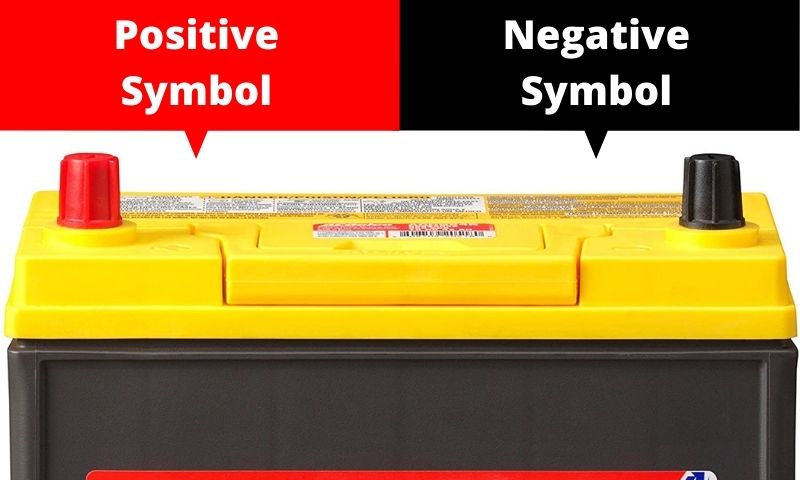
Positive terminal:
- Usually marked with a “+” sign or a red cover
- Connects to the positive cable (typically red in color)
- Supplies electrical current to your vehicle
Negative terminal:
- Usually marked with a “-” sign or a black cover
- Connects to the negative cable (typically black in color)
- Acts as a ground connection, completing the electrical circuit
Knowing the signs, colors, and functions of these terminals is essential when jump-starting a dead battery or connecting/disconnecting your battery for maintenance. Follow the simple steps, and you’ll be back on the road in no time!
Remember, if you ever find yourself in a tight spot, it’s always better to consult a mechanic or someone with experience. After all, safety first!
Now that we’ve covered the basics of polarity and the significance of positive and negative terminals, you’ll be able to tackle battery issues like a champ. Just don’t forget your wrench and safety gear.
How to Identify Positive and Negative Terminals?
Alright, so now that we’ve got a grip on the basics of car battery polarity, it’s time to learn how to identify those pesky positive and negative terminals. No worries, though—I’ve got you covered with some nifty tips and tricks that’ll have you spotting the right terminals faster than a race car driver shifts gears!
So, let’s dive right into How to Identify Positive and Negative Terminals on a car battery. Once you’ve mastered the art of terminal identification, you’ll be able to avoid potential risks and keep your vehicle running smoothly.
A. Common markings on car batteries
When it comes to identifying positive and negative terminals on a car battery, there are several ways to do so. Here are some of the most common methods:
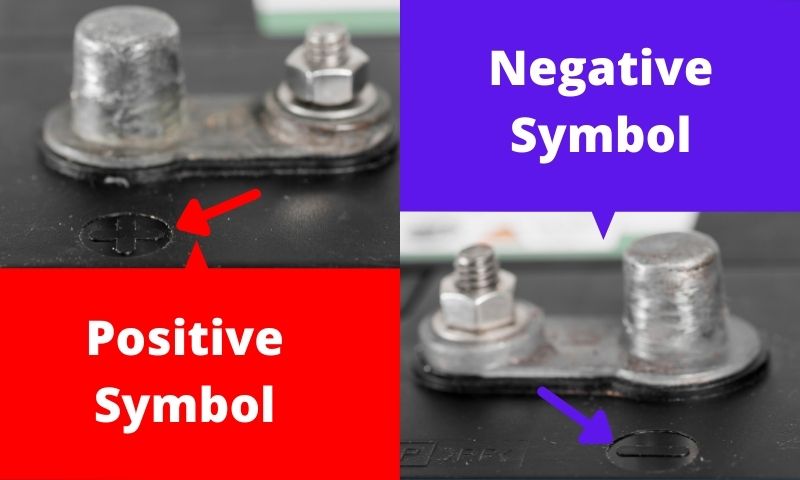
Positive Terminal Markings: The positive terminal is usually marked with a “+” sign on the battery case or cover. It can also be labeled with the letters “POS” or “P.”
Negative Terminal Markings: The negative terminal is usually marked with a “-” sign on the battery case or cover. It can also be labeled with the letters “NEG” or “N.”
Color Coding: Some battery manufacturers color-code the positive and negative terminals. The positive terminal may be red, while the negative terminal is black.
B. Other ways to distinguish positive and negative
Apart from common markings, here are a few other ways to tell the positive and negative terminals apart:
Terminal Size: In some cases, the positive terminal is larger than the negative terminal. This is not always the case, so it’s important to check the markings to be sure.
Location: The positive terminal is usually located on the side of the battery that is closest to the front of the vehicle. The negative terminal is usually located on the side of the battery that is closest to the back of the vehicle.
Cables: The cables that connect to the battery terminals are often color-coded. The positive cable is usually red, while the negative cable is usually black. However, this is not always the case, so it’s important to double-check the markings.
C. Pictures to illustrate positive and negative markings
Here are some pictures to illustrate the common markings on car batteries:
Positive and Negative Terminal Markings
Color-Coded Terminals
Terminal Size

Cable Colors
By using these methods to identify the positive and negative terminals on a car battery, you can avoid potential risks and ensure that you connect the cables correctly. Remember to always double-check the markings before connecting cables, and if you’re unsure, consult your vehicle’s owner’s manual or a professional mechanic.
Alright, hotshot! You’ve learned about battery polarity, the consequences of reversing it, and how to identify positive and negative terminals. Now, let’s put all this wisdom to good use and learn the ins and outs of Steps to Safely Connect and Disconnect a Car Battery. Trust me, these steps are so easy, even your grandma could do it (no offense, grandma.
Steps to Safely Connect and Disconnect a Car Battery
So, without further ado, let’s dive into the nitty-gritty of connecting and disconnecting a car battery, starting with some essential precautions and finishing up with some handy safety reminders and additional tips.
A. Precautions before starting
Before you even think about touching that battery, make sure you’re prepared:
- Wear appropriate safety gear: This includes gloves, eye protection, and proper clothing to protect yourself from battery acid and potential sparks.
- Ensure the vehicle is off and in a safe location: The engine should be off, the parking brake engaged, and the vehicle on a flat, stable surface.
B. Disconnecting the battery
Ready? Let’s start by disconnecting the battery:
- Locate the battery: Typically, it’s under the hood, but some vehicles have it in the trunk or under a seat.
- Identify positive and negative terminals: Use the tips we discussed earlier to spot those sneaky terminals.
- Disconnect the negative cable first, then the positive cable: Loosen the negative cable clamp with a wrench and remove it from the terminal. Repeat with the positive cable.
C. Connecting the battery
Now, let’s reconnect the battery, but remember—safety first!
- Connect the positive cable first, then the negative cable: Attach the positive cable clamp to the positive terminal and tighten it with a wrench. Repeat with the negative cable.
- Ensure secure connections and clean terminals: Check that the cable clamps are tight and the terminals are free of corrosion. If needed, clean the terminals with a wire brush.
D. Safety reminders and additional tips
Finally, let’s wrap up with some essential safety reminders and extra pointers:
- Always disconnect the negative cable first and connect it last to prevent accidental short circuits.
- Never touch the positive and negative terminals or cable clamps at the same time to avoid electrical shock.
- If you’re jump-starting a dead battery, connect the jumper cables in the correct order and never reverse the polarity.
- When in doubt, consult your vehicle’s owner’s manual or a professional mechanic for guidance.
There you have it, folks! With these simple steps, you’ll be a battery-connecting and disconnecting maestro in no time. Remember to stay safe, and happy motoring!
Alright, folks, buckle up because we’re about to dive into Troubleshooting Common Battery Issues. This is where the rubber meets the road, and all that knowledge we’ve accumulated comes in handy! We’re going to cover dead battery symptoms, jump-starting, and knowing when it’s time to replace that old battery.
Troubleshooting Common Battery Issues
So, let’s rev up our engines and get into the details of common battery issues, from dead battery symptoms to factors that affect battery life.
A. Dead battery symptoms
Some common signs of a dead battery include:
- Vehicle won’t start or struggles to start
- Dimming headlights and interior lights
- Slow or non-functioning power accessories
- Flickering or non-working dashboard lights
B. Jump-starting a car with a dead battery
If you find yourself with a dead battery, jump-starting might just save the day. Here’s what you need to know:
- Proper jump-starting procedure:
- Park the donor vehicle close to the dead vehicle, but not touching
- Turn off both vehicles and engage their parking brakes
- Connect positive jumper cable to the positive terminal of the dead battery, then to the positive terminal of the donor vehicle
- Connect negative jumper cable to the negative terminal of the donor battery, then to an unpainted metal surface on the dead vehicle’s engine block or metal chassis
- Start the donor vehicle, wait a couple of minutes, then attempt to start the dead vehicle
- If successful, disconnect cables in reverse order
- Importance of correct polarity during jump-starting:
- Reversing polarity can cause severe damage to electrical components and create potential safety hazards
- Always ensure you’re connecting the correct cables to the correct terminals
C. When to replace a car battery
Knowing when to replace your car battery can save you time, money, and headaches. Here’s what to look for:
- Signs of a failing battery:
- Slow engine cranking or frequent need for jump-starts
- Swollen or leaking battery case
- Check the engine or battery warning light on the dashboard
- Corroded or loose battery terminals
- Average battery lifespan:
- Most car batteries last between 3 to 5 years, but this can vary depending on usage and maintenance
- Factors affecting battery life:
- Frequent short trips
- Extreme temperatures (both hot and cold)
- Poor maintenance (e.g., not keeping terminals clean and tight)
Now you’re well-equipped to handle common battery issues like a seasoned pro! Remember, knowledge is power, and in this case, it’ll help keep your car powered too. Stay safe and happy driving!
Conclusion
Well, folks, we’ve reached the end of our electrifying journey through car battery basics. We’ve covered everything from identifying positive and negative terminals to troubleshooting common battery issues. Now you’re equipped with the knowledge to confidently handle battery-related situations and make informed decisions about your vehicle’s power source.
As always, remember that safety comes first. When working with car batteries, wear appropriate protective gear, follow proper procedures, and consult your owner’s manual or a professional mechanic if you’re ever unsure.
Armed with this newfound knowledge, you’re ready to hit the road and tackle any battery challenges that come your way. Here’s to many more miles of smooth, worry-free driving.
FAQ
What Color Do You Connect First On a Car Battery?
When connecting a car battery, you should first connect the positive (red) cable. This ensures a safe and proper connection to prevent electrical shorts or damage to components.
What Color Is Negative On A Car Battery?
The negative terminal on a car battery is typically marked with a black color, making it easier to identify when working with the battery.
What Color Is Positive On A Car Battery?
The positive terminal on a car battery is usually marked with a red color, making it easier to identify when connecting cables or jump-starting the vehicle.
What Is the Plus Side of a Battery?
The plus side of a battery refers to the positive terminal, which is marked with a “+” sign. It’s where the electrical current flows out of the battery.
Why Remove the Negative Battery Cable First?
Removing the negative battery cable first helps prevent short circuits and reduces the risk of sparks, which can lead to electrical fires or damage to sensitive electronics.
Is the left side of the battery always positive?
No, the left side of the battery is not always positive. The position of the positive terminal may vary depending on the vehicle or battery type. Always check the markings to identify the correct terminal.
Is my car positive or negative ground?
Most modern cars use a negative ground system, where the negative terminal of the battery is connected to the vehicle’s frame. Older vehicles (pre-1960s) may have a positive ground system, but these are less common today. Check your owner’s manual for specifics.
Related Post: